Showing posts with label french tip. Show all posts

Thursday, February 14, 2013

31 Day Challenge ~ Week 6 Violet for Valentines Day

31 Day Challenge ~ Week 6 Violet for Valentines Day

Happy Valentines Day everyone ~ I wanted to do something feminine but I didn't want to do reds and pinks, so I finally decided to do purple.


for this mani, I used:
  • OPI ~ significant other color
  • purple nail tape
  • konad ~ white polish
  • konad stamper & scraper
  • konad plate ~ m84
Signifcant other color is a super sheer pink purple with a warm green lime shimmers, very mesmerizing

Tuesday, February 5, 2013

31 Day Nail Challenge: Week 4 Green


Week 4: Tiffany


For week 4, it was a dilemma on which green to use :P, I ended up doing a Tiffany Robin Egg color with gold accent 

this mani was done with:
  • China Glaze ~ For Audrey
  • China Glaze ~ Angel Wings
  • triangle rhinestones 

After I did my pinky, I kind of like the 1 triangle rhinestone rather than the 3 better. :P

Monday, January 14, 2013

31 Day Nail Challenge: Week 1 Red

cute red bunnies manicure

as a part of of my week one challenge i had to think pretty hard on what to do because red isn`t a color that I love on me. so in order to incorporate red, i decided on something cute... like bunnies :P 

this cute red bunnies manicure is very simple and easy to do, everything can be done with dotting tools :P i decided to include a simple pictorial as well to show how my bunnies were done.
how to do cute red bunnies manicure nails

so here they are:

cute red bunnies rabbits manicure nails with polka dots

here is an image of before i added the polka dots, what do you think? with or without?

cute red bunnies manicure nails


this mani was done using:
  • china glaze ~ make some noise
  • nicole opi ~ razzle dazzler
  • opi ~ alpine snow

here is me spamming its cuteness lol


i hope you enjoyed it :P

Tuesday, January 8, 2013

hand painted roses


20121216-203548.jpg
Hand painted some hand roses, I wanted to practice a bit :)

I used:
American Apparel~l'esprit
opi~heart throb
opi~ don't talk Bach to me
china glaze~something sweet

classy expensive nails ~pretty easy nail pictorial 16


20121120-114634.jpg
classy expensive nails
I wonder if you guys feel the same, I think this beige colors reminded me of channel flap bag
what you need:
  • opaque or sheer color polish (OPI~Malaysian Mist)
  • sparkle polish (Essie~a cut above)
  • rhinestones
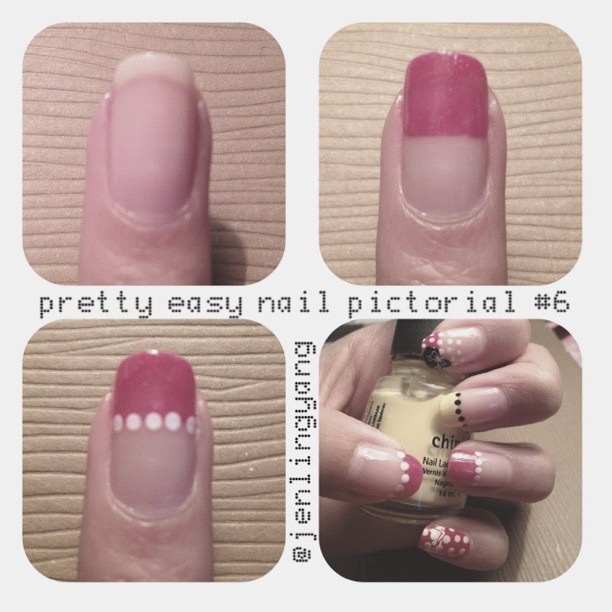
paint base coat to protect nails to minimize color staining
  1. paint half nail (color polish)
  2. decorate (glitter polish)
  3. decorate (rhinestone to line up the half nail)
add top coat to add shine and durability
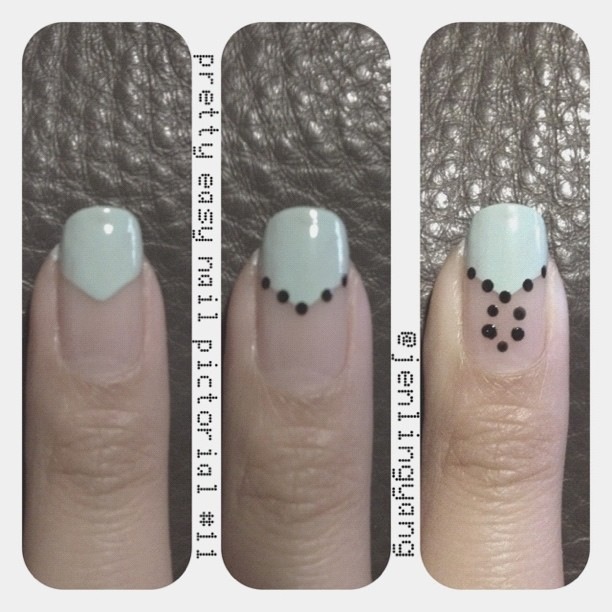
tips for adding rhinestones
applying rhinestones
  1. apply top coat
  2. use toothpick or pen to touch a bit of top coat from brush to get it a little sticky
  3. pick up rhinestones using the sticky part
  4. adjust onto nail
  5. seal with topcoat
I hope my tips are helpful
what colors do you think looks expensive? I have always wanted the Chanel Caviar flap bag, I find that both black and beige will be classy, but beige will look more youthful right?

neapolitan ice cream ~pretty easy nail pictorial 15


20121120-114545.jpg
neapolitan ice cream nails
what you need:
  • pink polish
  • white polish
  • brown polish
paint base coat to protect nails from color staining
  1. paint a quarter of a circle onto tips using pink (let dry)
  2. paint another quarter of a circle using white overlapping the pink (let dry)
  3. paint a quarter of a circle offsetting from pink (let dry)
  4. add optional sprinkles (glitter polish)
seal off using top coat to add shine and durability
another super easy nail design to play around with, change up colors and positions of the circles to create very different effects.
do you like sprinkles?

lady gaga inspired ~pretty easy nail pictorial 13

20121120-114437.jpg

lady gaga costume inspired

using:
  • grey polish (sheer/jelly)
  • silver glitter polish
  • rhinestones
  • sponge
paint base coat to minimize color staining
  1. use sponge to dab some grey polish ideally about a bit over halfway onto nail (let dry, go onto the next nail, by the time you are finish with all five fingers, it should be dried enough)
  2. re-dab more polishes about a little under the first dabs to create a gradient look (if you want more opaque on the tips)
  3. paint a glitter polish (covering just bit over the first of grey polishes)
  4. re-dab more polishes under the glitters (to create a semi-transparent look)
  5. apply top coat as glue to hold rhinestones (use a toothpick to touch a bit of top coat to make it sticky to pick up the rhinestones)
apply top coat again to secure the rhinestones, adding shine and durability
this look is quite easy to wear with a lot of glam!
20121122-142412.jpg

girly gradation ~ pretty easy nail pictorial 12

20121120-111348.jpg
tried the sponging technique for a nail contest, along with stamping

using:
konad ~ stamper & scraper
konad ~ white
konad ~ m(forgotten plate no.)
china glaze ~ pink (forgotten color id)

dotted loop ~ pretty easy nail pictorial 11

20121120-111306.jpg

still experimenting, i reversed the chevron look and added a loop of dots

using:
opi ~ gargantuan green grape
opi ~ black (forgotten color id)
dotting tool (NDS pen)

simple chevron ~ pretty easy nail pictorial 10

20121120-111217.jpg
my first time with micro beads

using:
china glaze ~ pastel purple (forgot color id)
anna sui ~ 004
siliver micro beads

puzzled? ~ pretty easy nail pictorial 9

20121120-111138.jpg

simple combination of of white and lavender with a dotting tool

using:
opi ~ alpine snow
china glaze ~ light purple (forgotten color id)

french with a script ~ pretty easy nail pictorial 8

20121120-121758.jpg

i just wanted to do something simple but with a twist. just simple white french, then using the french smile line as a guide, lined up my "love" to it.

using:
opi ~ alpine snow
opi ~ metallic 4 life

noticed how i still didnt have many polishes yet a lot of very simple color combination :P

polka dots ~ pretty easy nail pictorial 7

20121120-110303.jpg

As I recalled, this was not the mani design that I liked the most but i think it was a starting point towards other designs :)

using:
china glaze ~ tantalize me
opi ~ alpine snow

minnie mouse inspired 2 ~ pretty easy nail pictorial 6

20121120-110212.jpg

this was from a second entry to minnie mouse inspired nail art contest, i took inspiration from minnie's pearl necklace to as a feature to my design. The dotting tool that I was using at the time was a Nintendo DS pen, which i found very useful in contrast to the bob pinned onto pencil. I was a lazier person :P I still am

using:
china glaze ~ red (forgotten color id)
opi ~ alpine snow
dotting tool ~ (which at the time was an NDS pen)

minnie mouse's princess gown ~ pretty easy nail pictorial 4

20121120-114349.jpg

it was from a minnie mouse inspired contest, very strange, some one else also had posted later on a very similar design for the contest. It was shockingly similar.

using:
china glazes red, pink (forgotten color id)
opi ~ alpine snow
opi nicole ~ black (forgotten color id)

inspired clouds ~ pretty easy nail pictorial 3

20121120-114307.jpg

I saw a very cute image of an owl with background from @tantyys on instagram, so I wanted to do my nails in that theme. Which was when I realized I actually don't have enough nail colors to match up to the colors in the the image... a turning point to when I realized I needed more... It really became the starting point of this infatuation.

using:
essie ~ mint candy apple
opi ~ alpine white

black french tips with sparkle ~ pretty easy nail pictorial 2

20121120-114248.jpg

black french tips with sparkle

i did this for my friend joyce, at her house, where i continued to experiment with this process of recording the steps on how the design was done.

using:
pearl nail polish (sorry i don't remember what polish this was)
sally hansen ~ no chip 30 Day nail color black (I wouldn't have remembered if it wasn't in the photo)
anna sui ~ #004

something simple, excuse me for the sloppiness, i was still a newb