Showing posts with label easy. Show all posts

Monday, January 14, 2013

31 Day Nail Challenge: Week 1 Red

cute red bunnies manicure

as a part of of my week one challenge i had to think pretty hard on what to do because red isn`t a color that I love on me. so in order to incorporate red, i decided on something cute... like bunnies :P 

this cute red bunnies manicure is very simple and easy to do, everything can be done with dotting tools :P i decided to include a simple pictorial as well to show how my bunnies were done.
how to do cute red bunnies manicure nails

so here they are:

cute red bunnies rabbits manicure nails with polka dots

here is an image of before i added the polka dots, what do you think? with or without?

cute red bunnies manicure nails


this mani was done using:
  • china glaze ~ make some noise
  • nicole opi ~ razzle dazzler
  • opi ~ alpine snow

here is me spamming its cuteness lol


i hope you enjoyed it :P

Friday, January 11, 2013

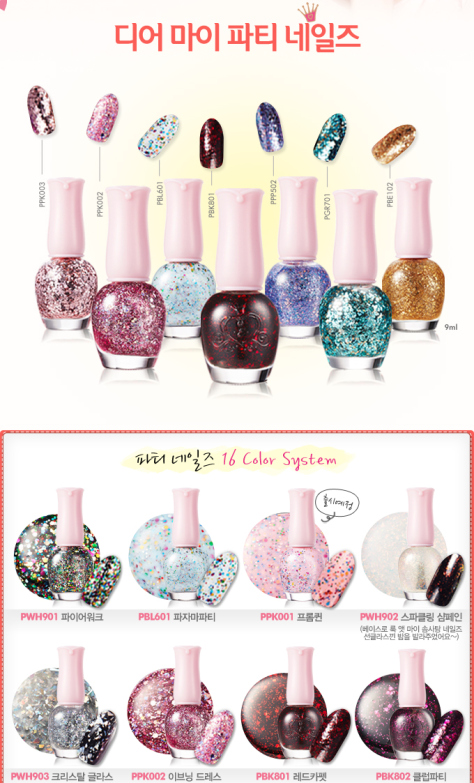
elmer's glue as peel off base coat x etude house PGR701 helium balloon review ~ part II

after the successful peeling of elmer's glue as base coat, this time i want to see how long it can last on my nails :P and here are some images of it before drying entirely

elmers glue peel off base coat
it is a bit difficult to try and apply the glue evenly, after trying my best it still looks gloppy as it dries but it dried to feel even.


elmers glue peel off base coat
on my pinky nail the elmer's glue is dried matte, on other three fingers, the elmer's glue is still wet which has a glossy look
it takes roughly 10 minutes to dry complete

after the elmer's glue dried, i used 4 coats of etude house Dear My Party Nails pgr701 Helium Balloon and plenty of top coat for it to feel even.

etude house pgr701 helium balloon dear my party nails collection
Etude House PGR701 Helium Balloon ~ Dear My Party Nails Collection

this mani was done using:
elmer's glue ~ peel off base coat
essie ~ grow stronger
etude house ~ pgr701 helium balloon
essie ~ good to go top coat

did you noticed how everything started with an "e"? hahah <- so random :P

I also wonder how long it can be worn, but judging from the number of layers, i feel that its pretty sturdy, if it lasts 3 days i would give it a perfect score as i don't think i would want to wear it any longer :P


Etude House PGR701 Helium Balloon Review:
  • it dries quick: 4/5
  • even application: 3/5
  • flat glitter: 2/5 
  • scent is strong: 2/5
  • coverage: 3/5
i wasn't too impressed with this glitter because i like my glitters flat. because of the glitters' "taco"ing, it took 4 coats to get this coverage, and it sucks all the top coat, i had to use three coats of essie ~ good to go


Wednesday, January 9, 2013

elmer's glue as peel off base coat x sinful colors x etude house

elmer's glue as peel off base coat 


i have been quite skeptical to try elmer's glue as a peel off base coat because i am afraid of its ability to stay on my nails. but the little time that it will need to remove glitter polish was too much to resist. it would be the easiest way to remove glitter polish if it does work. luckily, although it is not something i am proud of, i don't actually do enough housework to wear out my nails nor do i have to worry about it chipping into my food. therefore, there's no excuse to not try it out.

etude house nail polish dear my party nails


this new awareness that it is okay to wear as much glitter as to my heart's content is pretty awesome. with that awareness i decided to wear a glitter polish that i find super hard to match, its an etude house Dear My Party Nails ppp502 Halloween Day because it has very small purple and pink glitters of different sizes 
etude house nail polish dear my party nails
i do find the polish a bit sheer so I am unsure how many coats it needs to swatch like the above image. 

my current mani is using:

elmer's glue as a base,
essie ~ grow stronger
sinful colors ~ purple diamond
etude house ~ ppp502 Halloween Day

it turned out quite pretty, but i am really really tempted to start peeling my polish to see how it works
i know i didn't go too close to my cuticles as its my first time to try and peel of the polish, i wanted to give myself some room :P

etude house dear my party nails nail polish ppp502 halloween day with sinful colors purple diamond


elmers glue as base coat peel off


elmers glue as base coat peel off


elmers glue as base coat peel off


and this is me peeling it off  ~~ it's so much fun actually, but i couldn't get mine to come off in one piece like i have seen in many other blogs

Tuesday, January 8, 2013

deborah lippmann ~ candy shop? ~copycat


I have been wanting Deborah lippmann's candy shop polish for a while but it is quite pricey for me to buy this one polish when I have dozens of polishes that I equally love and want to buy in a fraction of that price. So, my solution is to use what I already have to create the look :)
Opi ~ heart throb is a pretty pink jelly in my collection


using:
China glaze~ it's a Trap-eze (1 thin coat)
Opi ~ heart throb (2 thin coats)


In applying China glaze~ it's a Trap-eze I tried to control the amount of glitters because the glitter concentration is too high in the look that I want, so one coat is more than enough
Then I simply applied 2 thin coats of Opi ~ heart throb
I wonder how close am I with the color comparison with swatches of Deborah Lippmann ~ candy shop
I hope you enjoyed my post
20130106-114426.jpg

China Glaze~it's a trap-eze


20121210-105754.jpg
I have been craving for this particular polish since the time I found out about it. It did not disappoint!! Totally love the sprinkle like effect! I really understand why it would be a member of the cirque du soleil collection, the colors and excitements!!
This is 2 coats and it covers well, although the glitters doesn't spread out evenly, the clustered look seems to make sense to me. Doesn't that remind you of the circus? It attracts all kinds of people and brings them to the same location forming crowds and crowds of excitement? Just a random thought. Don't know how that has to do with application of a nail polish. Have a nice day :)

ugly sweater nails


20121126-113420.jpg
ugly sweater nails
This combination would actually work of it was a pink sweater with beige or brown polka dots, its hard to even find a beige sweater and pink polka dots
What I used:
konad stamping scraper and stamper
konad plate m84
konad plate m79
konad pink polish
OPI~Don't pretzel my button 
China Glaze~I'm not lion
You can always do polka dots by using dotting tools too

dreamy stars ~*


20121124-233226.jpg
Dreamy stars
I used previous manicure as a base to create this look
The pattern is made with:
  • Konad white polish
  • Konad plate m84
  • Konad stamper and scraper
I loved the jelly, adding stars to it just feels right. What do you think?

jelly of all the franken jellies ~ pretty easy nail pictorial 21


20121122-202146.jpg
jelly of all the franken jellies, u too?
Lately I saw a lot of pretty franken/indie jellies and I became very jelly myself but the costs to get them to me become very high :(
so here's my solution to get the look :)
what you need:
  • sheer polish (OPI~Care to Danse)
  • pink glitter polish (Essie~A cut above)
  • silver holographic glitter polish (China Glaze~Techno)
apply base coat to minimize color staining (I used Essie~Grow Stronger)
  1. sheer polish (2 coats of OPI~Care to Danse) - number of coats base on opacity preference
  2. pink glitter polish (1 coat of Essie~A cut above)
  3. silver holographic glitter polish (1 coat of China Glaze~Techno)
  4. sheer polish (1 final coat of OPI~Care to Danse) - number of coats base on opacity preference
here is what it looks like from step 3 to 4, I thought about stopping at step 3 because it was already quite pretty :) but i was set on a jelly look so...
20121123-101745.jpg
20121122-203223.jpg
I hope you enjoyed my post, and I would love to see your take on this :) tag me!!!

ombre / gradient nails ~pretty easy nail pictorial 20


20121120-115828.jpg
I know there are a few methods to doing an ombre or the gradient look, and this is the method that I adapted and find is the easiest to get a pretty transition without too many steps.
What you ll need (varies based on the number of colors):
  • base nail polish color
  • second transition nail polish color
  • sponge
  • shimmer and/or top coat polish
Hence the easiest :) all you really need is a sponge if you already have nail polishes
wear base coat to protect nails from color stainage
  1. paint your nails with a base color nail polish (and let dry)
  2. paint both colors on sponge
  3. dab the colors (a few times, dont worry if its stubtle) onto each nail (add polish onto sponge when needed, once you go through all the nails it will dry a little bit)
  4. dab the colors (a second time to increase the pigment concentration) onto each nail (repeat dabbing colors cycling through the nails to increase pigments)
  5. apply shimmers or top coat polish
  6. pose (hahah, if you like)
apply top coat to give an extra shine and durability
I hope you enjoyed my pictorial and find it helpful
I would also love to see image replies of your nails did, when you try ombre or gradient nails with this method and let me know what you think

jelly sandwich nails ~pretty easy nail pictorial 19


20121120-115620.jpg
jelly sandwich nails
sandwiching sparkle nail polish between two coats of color, which resembles the method of putting a sandwich.
what you need:
  • a sheer polish (semi-transparent)
  • glitter polish
wear base coat to protect nails from color stainage
  1. paint one or two coats of sheer polish color (let dry)
  2. paint glitter polish
  3. paint another coat sheer polish
apply top coat to give extra shine and durability
a very easy method to add sparkles with a bit of subtlety

field of hearts ~pretty easy nail pictorial 17


20121120-115516.jpg
field of hearts
what you need:
  • dotting tools (or tooth pick, pins)
  • striping brush (striping polish)
  • opaque polishes (colors based on preference)
paint a base coat to protect your nails from staining
  1. paint straight lines at various lengths (with striping brush or striping polish)
  2. dot hearts (with tooth pick or pinheads dabbed with opaque polishes)
  3. repeat dotting hearts onto lines
seal with top coat to give it shine and durability
a seriously really easy and pretty way of doing nails, I wanted to wear minimal polish that day so I did not even paint a base color, but certainly welcome to if you like

girly gradation ~ pretty easy nail pictorial 12

20121120-111348.jpg
tried the sponging technique for a nail contest, along with stamping

using:
konad ~ stamper & scraper
konad ~ white
konad ~ m(forgotten plate no.)
china glaze ~ pink (forgotten color id)

dotted loop ~ pretty easy nail pictorial 11

20121120-111306.jpg

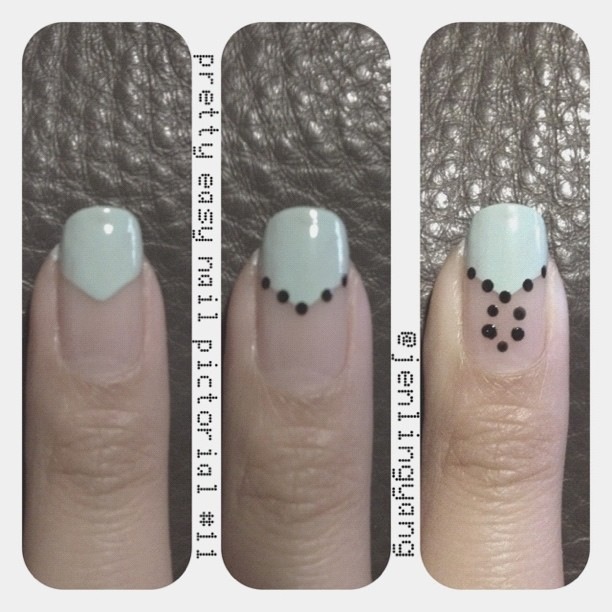
still experimenting, i reversed the chevron look and added a loop of dots

using:
opi ~ gargantuan green grape
opi ~ black (forgotten color id)
dotting tool (NDS pen)

puzzled? ~ pretty easy nail pictorial 9

20121120-111138.jpg

simple combination of of white and lavender with a dotting tool

using:
opi ~ alpine snow
china glaze ~ light purple (forgotten color id)

polka dots ~ pretty easy nail pictorial 7

20121120-110303.jpg

As I recalled, this was not the mani design that I liked the most but i think it was a starting point towards other designs :)

using:
china glaze ~ tantalize me
opi ~ alpine snow

inspired clouds ~ pretty easy nail pictorial 3

20121120-114307.jpg

I saw a very cute image of an owl with background from @tantyys on instagram, so I wanted to do my nails in that theme. Which was when I realized I actually don't have enough nail colors to match up to the colors in the the image... a turning point to when I realized I needed more... It really became the starting point of this infatuation.

using:
essie ~ mint candy apple
opi ~ alpine white

my first pictorial ~ pretty easy nails pictorials 1

20120811-184947.jpg
a while back, but not too long ago i started to do pictorials because I thought it was fun to watch things done step by step even though sometimes it is for something so simple. this was the first one.

using:

essie ~ chinchilly
bronze striper polish
gold stud rhinestones